Consuming an API with Excel
A hands-on tutorial that demonstrates the first steps for consuming a simple API with Excel.

Contents
This tutorial is for you if you're an Excel user who would like to learn how to extend your spreadsheets with data from APIs. You might be one of the people who spend most of their workdays in Excel and do calculations and visualizations but still work manually to import or even just copy and paste data from external sources.
If data is available from an API, however, there are various ways in which can consume it directly from Excel, saving you time and preventing errors.
That is, unfortunately, just as long you are using a Windows PC. The integrations presented in this article do not work in Excel for Mac or the web-based version of the Office apps.
The API
BASF provides the Periodic Table of Elements API, which enables you to query the periodic table and retrieve all kinds of information about chemical elements.
Understanding the API
We assume you came here from the Introduction to APIs. If not, please check out that document to learn the basics of APIs before continuing.
The Periodic Table of Elements API follows the CRUD/RESTful paradigm but implements only a subset. Specifically, the periodic table is read-only and allows HTTP GET requests exclusively. It is also limited to one resource called "element".
The base URL for the API is https://dev.api.basf.com/chemical/. Every endpoint starts with this URL.
For the elements, there are two endpoints. The first is a collection endpoint that allows you to either retrieve the full periodic table or request a subset of elements through filter parameters. It is called a collection endpoint because it always returns a collection data structure containing multiple items. The second is an individual resource endpoint that allows you to retrieve a single element.
Both endpoints return JSON-formatted responses.
Prerequisites for Use
All BASF APIs require authentication. The Periodic Table of Elements API uses an app-only context with an API key. If you haven't done so, please read the introduction, terminology, and app-only context sections of the Authentication and Authorization guide. You can skip the part on the app and user context and OAuth as it is not required for this API.
To use authentication, you need to create an account and an application. The process gives you a Client ID, which you can then use as your API key. If you do not have an API key, follow the steps outlined in the Get Started guide. Make sure you select the API product BASF Periodic Table while creating your app.
Evaluating your Options
In Excel for Windows, there are three options for getting external data from an API, which we'll investigate throughout this article.
The first option is the built-in WEBSERVICE() function. Retrieving data from a URL is a single step. However, extracting the information is rather cumbersome as Excel doesn't understand JSON responses and you have to use string processing functions. Also, as the function only supports the URL as a parameter, this works only with APIs that allow you to provide authentication information as part of the URL. The BASF Periodic Table of Elements API fits the criteria, as it uses a query string for authentication. For other APIs that require custom headers, though, you're out of luck.
The second option is using VBA, Visual Basic for Applications, to write a Macro in Basic code to consume an API and fill the sheet programmatically. It is the most powerful and flexible option and should work with all kinds of APIs, but it requires you to have some basic programming knowledge.
The third option is the Power Query builder that allows you to gather and combine data from different sources, including APIs. If you have already used the Power Query builder, for example, to access a database directly, this is the sensible way to do it. It's also a good choice if you do not want to work with code and the WEBSERVICE() option is too limited.
We'll use an individual resource endpoint with the WEBSERVICE() function as well as the VBA macro, and we'll demonstrate the collection endpoint with the Power Query builder.
The WEBSERVICE() Function
Before we introduce the WEBSERVICE() function, let's look at functions in Excel in general. They allow you to fill a table cell with computed data. To enter a function into a cell, you start with the equals sign (=), followed by the function name, a left parenthesis [(], your arguments (if needed), and a right parenthesis [)] to end. If there is more than one argument, you separate them with semicolons (;). A common function that you may have used is SUM(), which adds the data from a number of other cells and returns the result. It takes a range of cells as its argument.
The WEBSERVICE() function also takes one argument, a URL. Then, Excel issues an HTTP GET request to fetch whatever is available at that URL, and puts it into the cell as its result. If we want to do an API requests, since the function only allows a single argument, we have to encode the full API request into the URL. As mentioned before, this rules out APIs that require other HTTP methods (such as POST) or custom headers, e.g., for authorization. With the Periodic Table API, however, we put the API key in the URL and only need the GET method.
A first Request
Open a new Excel workbook, and enter the following line into a cell, replacing the string APIKEY with the previously generated key:
=WEBSERVICE("https://dev.api.basf.com/chemical/elements/He?x-api-key=APIKEY")
Once you hit Enter or click on another cell, you should see a JSON structure describing the Helium element appear in your cell.

Understanding and dynamically building the URL
As mentioned before, every API endpoint starts with the base URL. For the Periodic Table API, that is https://dev.api.basf.com/chemical/. Then, the path to a resource or collection endpoint follows. In our example, we retrieved a single element, hence, we used a resource endpoint. Typically, the path to a resource starts with the pluralized resource name, followed by a slash (/) and finally an identifier. If you look at the URL above, you can identify elements/He as this path. The question mark (?) separates the parameter section, and you can see the x-api-key parameter that authenticates the request.
We can separate the base URL and the API key from the URL and build the URL dynamically through string concatenation. That is useful if you have multiple requests in the same Excel sheet and, let's say, you want to share this sheet with another person who then provides a different API key. The other person then only has to enter their API key in one designated cell instead of modifying your API requests.
As next step, we'll create a sheet that allows users to modify the base URL and API key in one place. We'll also apply string processing functions to parse a single field from the JSON response. You can follow along these steps. If something is unclear or doesn't work for you, you can compare your sheet with the screenshots as well as the full Excel workbook that we'll provide as download further below.
Here we go:
- Type "Base URL" in A1 and the base URL https://dev.api.basf.com/chemical/ in B1.
- Type "API Key" in A2 and paste your API key from the developer portal in B2.
- Type "Element" as a header in A4 and some elements below it. As an example, we'll put "H" in A5 and "N" in A6.
- Type "API URL" as a header in B4. To build the URL, concatenate the following elements: a reference to the field containing the base URL, "elements/", a reference to the field containing the element name, "?x-api-key=", and a reference to the field containing the API key. You need to use absolute references to base URL and API key and a relative reference to the element name. Your function call should look like this: =CONCAT($B$1;"elements/";A5;"?x-api-key=";$B$2)
- Type "API Response" as a header in C4. Make the webservice call using the URL you built in the previous step by typing =WEBSERVICE(B5) in C5. You should see a JSON API response appear in the cell.
- Type "Atomic Mass" as a header in D4. As there is no JSON parser in Excel, we copy a substring from the API response between the atomic_mass field and the subsequent field, covalent_radius. The whole function looks like this: =MID(C5;SEARCH("atomic_mass";C5)+13;SEARCH("covalent_radius";C5)-SEARCH("atomic_mass";C5)-16) You should now see only the atomic mass as a number in the cell.
- Select the cells B5 to D5, grab the right bottom corner, and drag them down to the B6 to D6. You should see the API URL, API response and atomic mass for the second element appear.
- To get the atomic mass for more elements, add a new element symbol in column A and copy or drag down the three other columns.
Please note that Excel function names are localized along with the Excel user interface. If your Excel installation is in German, replace the names based on this list:
- CONCAT – TEXTKETTE
- MID – TEIL
- SEARCH – SUCHEN

You can get a working Excel workbook in the PeriodicTableWebservice.xlsx file (TODO: add download).
A VBA Macro
Visual Basic for Applications, or VBA for short, is a powerful programming language that you can use to automate Microsoft Office applications, including Excel. VBA is closely related to, but not fully compatible with, other versions of the Basic language (such as Visual Basic .NET).
If you not worked with VBA before but have programming skills in a different language, you have to learn a new syntax, but should be able to understand the structure of the macro we build in this section.
The Objective
Our goal is to retrieve various attributes of specific chemical elements (but not the entire periodic table). The sheet layout uses one row per element. The user should enter the element names into the first column of the sheet (A). Then, upon running the macro, it should go through the list of rows and fill the other columns with details. For example, the atomic mass in the second column (B) and the covalent radius in the third column (C).
Getting Started
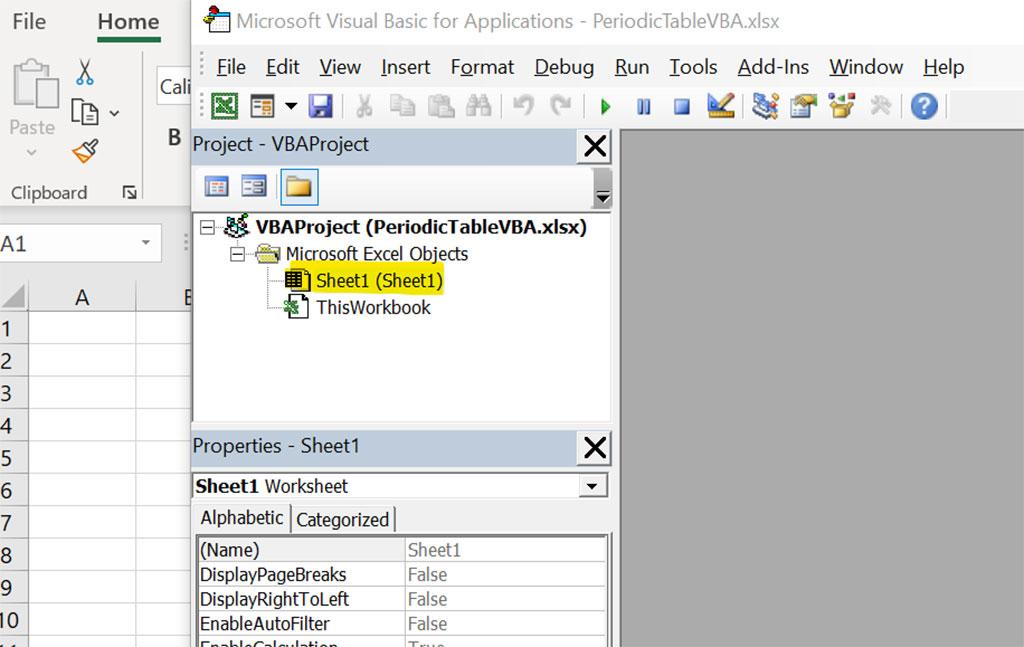
Open Excel with a new, empty sheet. Then, press the combination Alt and F11 on your keyboard to launch the Visual Basic editor.
On the left side of the editor, you can see the project structure. There's an entry for your sheet. Double-click on this entry to open the code view where you can enter Basic code that is specific to that sheet.
We start by creating two global string variables, one for the base URL and the API key. It helps us separate them from the code itself so we can swap them if necessary.
Dim baseUrl, apiKey As String
It's not possible to assign a value to these variables yet. We'll do that later.
Writing a Function
As mentioned under the objective above, we need to retrieve specific elements that the user enters into the sheet, not the full periodic table. For this purpose, we use the API endpoint for specific elements and have to make multiple requests. Hence it is useful to develop an abstraction and put the logic for the API request into a function.
In VBA, you can define functions with the Function keyword. They have parameters with types and a return type. Here is the definition of our getElement() function:
Function getElement(id As String) As Object
Next, we create a script control. That is actually a workaround because there is no native JSON parser available and we don't want to install a third-party module. The script control can execute JScript, which is a version of JavaScript, and thus understand JSON.
Dim scriptControl As Object
Set scriptControl = CreateObject("MSScriptControl.ScriptControl")
scriptControl.Language = "JScript"
Then, we can make an HTTP request to the API endpoint. VBA makes HTTP requests through the XMLHTTP object. While building the request, we use string concatenation to build the API URL and include the base URL and API key from the variables we defined earlier.
With CreateObject("MSXML2.XMLHTTP")
    .Open "GET", baseUrl + "elements/" + id + "?x-api-key=" + apiKey, False
    .send
Once we have a response, we can parse it with the script control and assign the result to the function name, which is VBA's way of specifying the returned value for a function:
    Set getElement = scriptControl.Eval("(" + .responsetext + ")")
    .abort
After that, all is left is closing the With-block and the function. The VBA editor might have already generated this code for you automatically.
End With
End Function
Creating the Macro
Macros are public VBA subroutines. Let's call ours getPeriodicElementData():
Public Sub getPeriodicElementData()
Inside the subroutine, we first assign some values to our global variables. Add these lines and replace APIKEY with your API key from the developer portal:
baseUrl = [https://dev.api.basf.com/chemical/](https://dev.api.basf.com/chemical/)
apiKey = "APIKEY"
Then, as we want to go through our sheet row by row to get element data, we set up a counter variable:
Dim row As Integer
row = 1
Our algorithm goes through all rows until it stops at an empty row. We can achieve this with a Do-Until-loop:
Do Until IsEmpty(Cells(row, 1))
Inside the loop, we call our getElement() function we created in the previous section. By using a With-block, we can access the attributes of the elements directly and write them in the cells. Our sample code reads two attributes, atomic mass and covalent radius, which go in the row of the current element and the second or third column respectively.
    With getElement(Cells(row, 1))
        Cells(row, 2) = .atomic\_mass
        Cells(row, 3) = .covalent\_radius
    End With
If you want, you can extend this code with more properties from the element object and put them in additional columns. Tip: Use the WEBSERVICE() function to get the full JSON structure so you can see the available properties.
Afterwards, make sure to increase the row variable, otherwise you have an infinite loop:
row = row + 1
Finally, we close the loop and the subroutine. The VBA editor might have already generated this code for you automatically.
Loop
End Sub
Running the Macro
Before we can run the macro, we should add a couple of element symbols in the first column (A) so that the macro has something to do. As an example, use the elements H, S and O. Use one row for each, so that H is in the first, S in the second and O in the third row.
During development, you can run your macro directly from the VBA editor, using either the play button in the toolbar, the Run menu, or the F5 key on your keyboard.
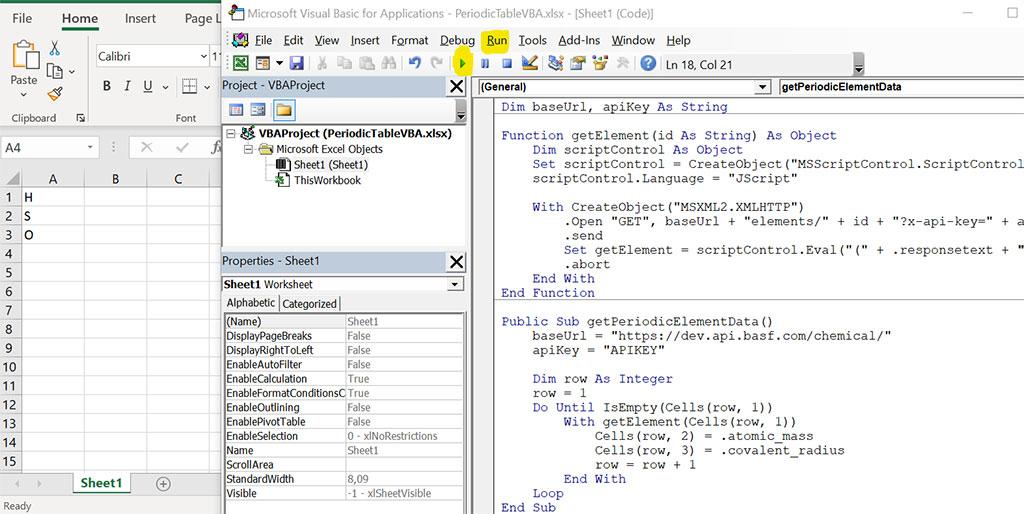
The macro should run and automatically fill the other columns for your three rows.
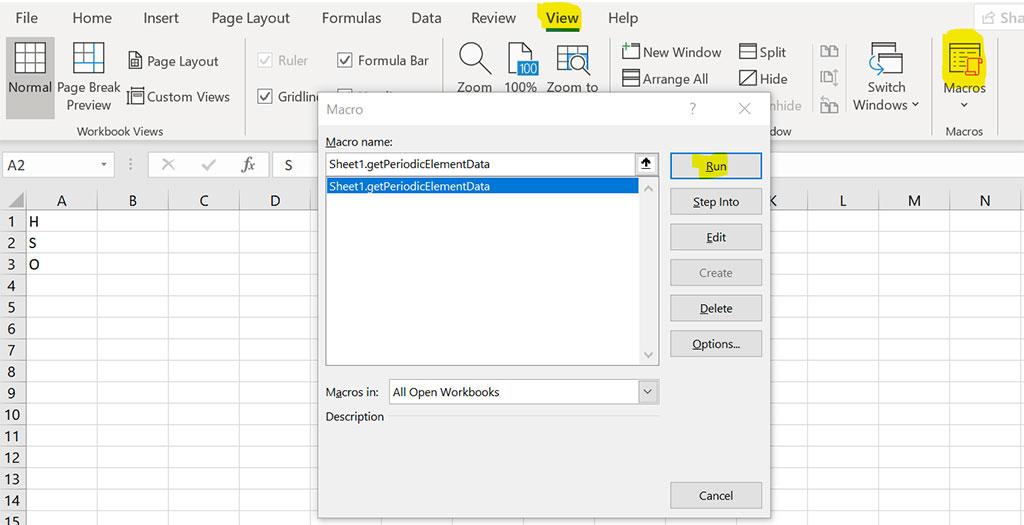
To re-run your macro later when you've closed the VBA editor, follow these steps:
- Open the View ribbon.
- Click on Macros.
- Select the macro and click Run to execute.
Power Query Builder
The Power Query builder provides access to a variety of data sources. It even enables the combination of data from multiple sources. In this tutorial, though, we'll just show you the basics to make an API call and display the results in your Excel sheet. We use the collection endpoint to retrieve the complete periodic table.
To get started, go to the Data ribbon, click the Get Data button, choose From Other Sources, and From Web.
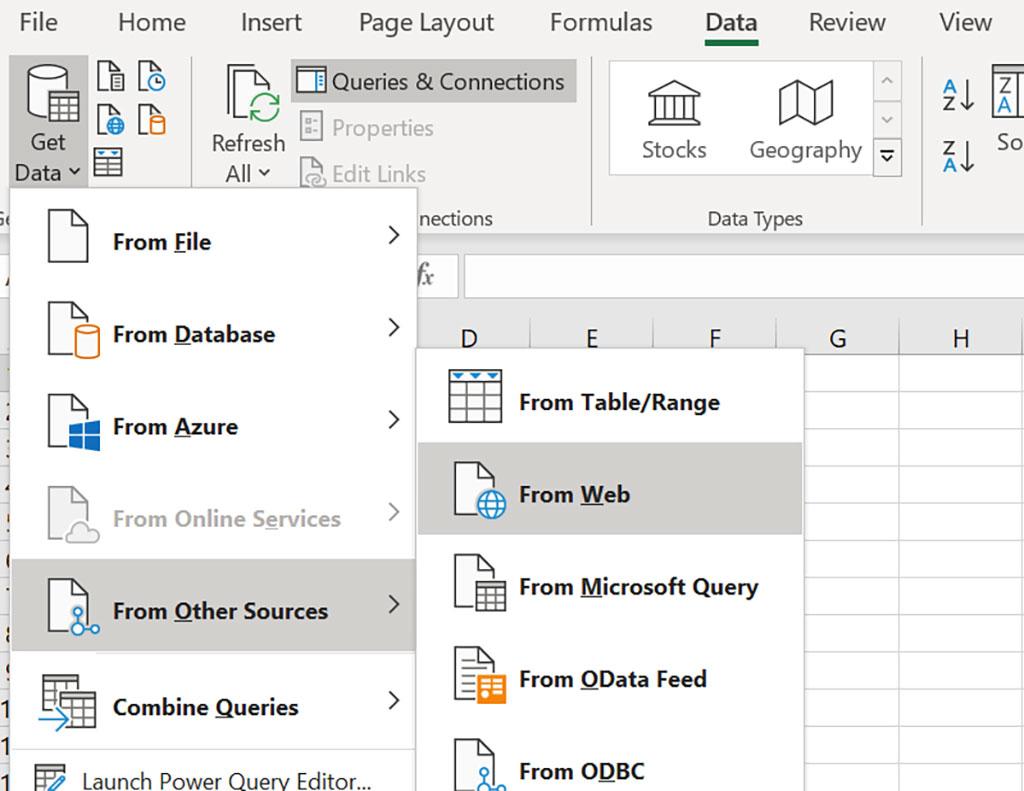
In the popup window, enter the URL for the API. You can configure advanced settings such as HTTP headers for your request, but the BASF Periodic Table API doesn't need any. You have to provide the full URL to the collection endpoint and add the query parameter for authentication directly into the URL. In the following sample, replace APIKEY with the Client ID of your application
https://dev.api.basf.com/chemical/elements?x-api-key=APIKEY
Once you confirm with OK, the Power Query Builder opens and shows the API response. At first, you just see the container element items. Right-click on it and select Drill Down.
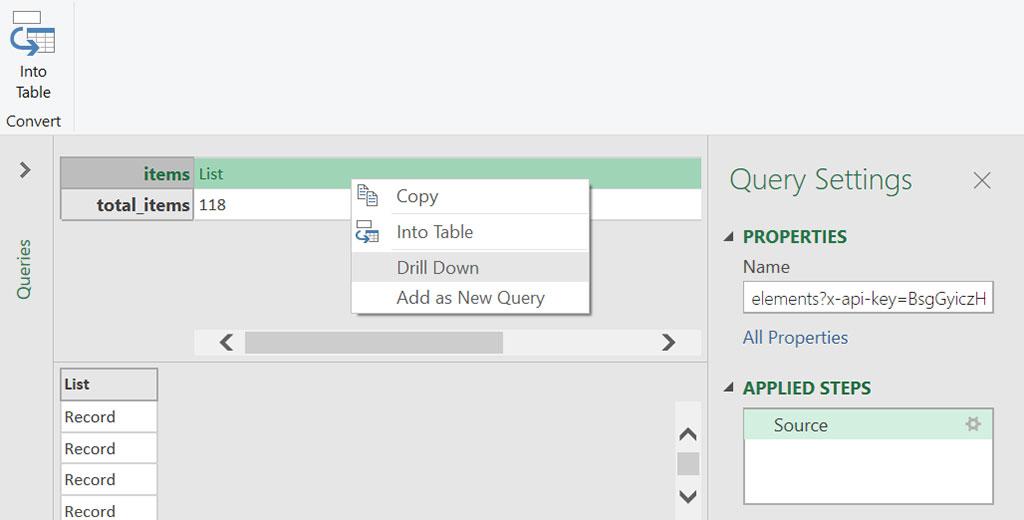
Note the list of applied steps on the right side of the window. It shows you everything you did in the query builder and you can undo any step by clicking the X next to it.
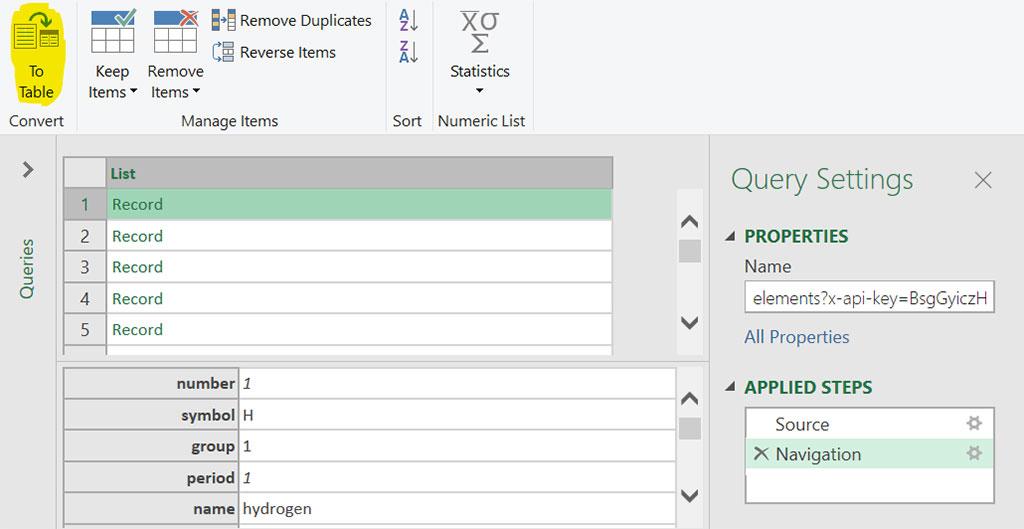
Now you see a list of records and you can click on each to see the different attributes of each element. The next step is converting this list into a table and you do this by clicking the To Table button.
A popup with additional options may appear which you can simply confirm with OK. After that, you see the list as a table but it still has just one column that we need to expand into multiple columns so you can see each attribute of the element in its own column. To do so, click the expand icon (<>) in the column header.
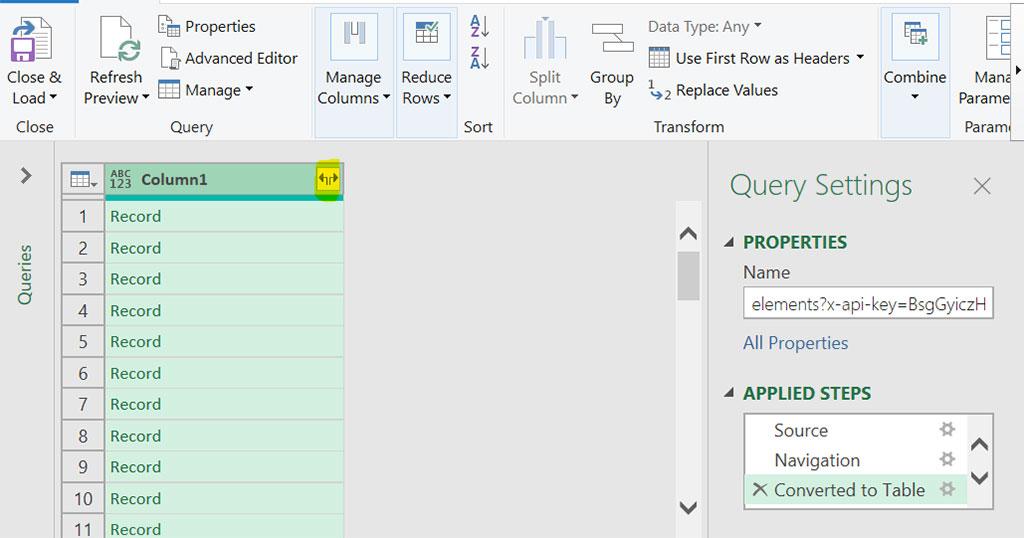
In the popup, select the fields that you like or keep all fields intact. You can uncheck "Use original column name as prefix" as the prefix doesn't provide any value when you're just working with one data source.
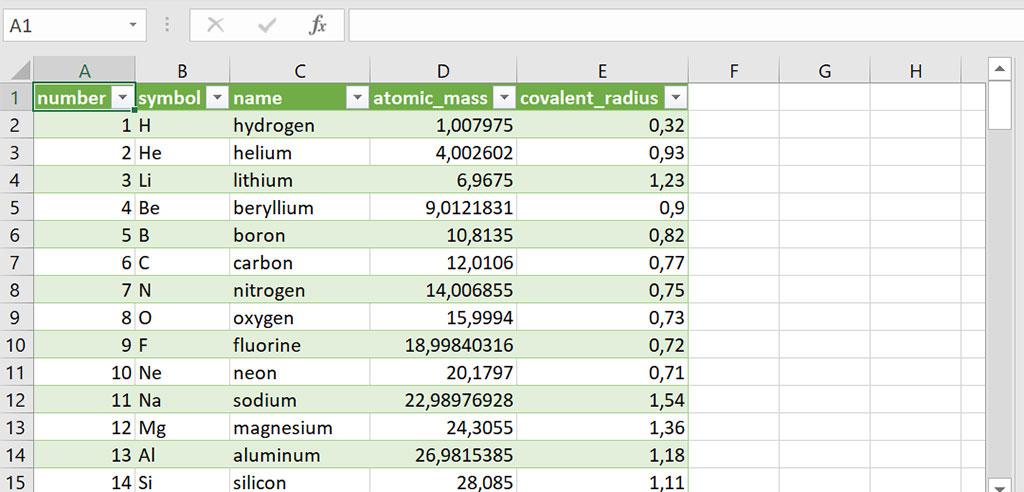
Once you see the data you want in the query builder, your final step is transferring the table into the Excel sheet. You do this with the Close&Load button.

You're done! Your excel sheet contains the periodic table of elements now.
Final Remarks
Congratulations on making it through the tutorial! We hope it deepened your understanding of APIs and how to consume them with Excel. Feel free to contact [email protected] with feedback and questions.